Thursday, March 27, 2014

My Cakes!

Hi!

I just wanted to share the cakes I've made this (so far) year and last year. I love cake decorating and love to learn new techniques! Let me know what you think! Thanks!


-Joanna


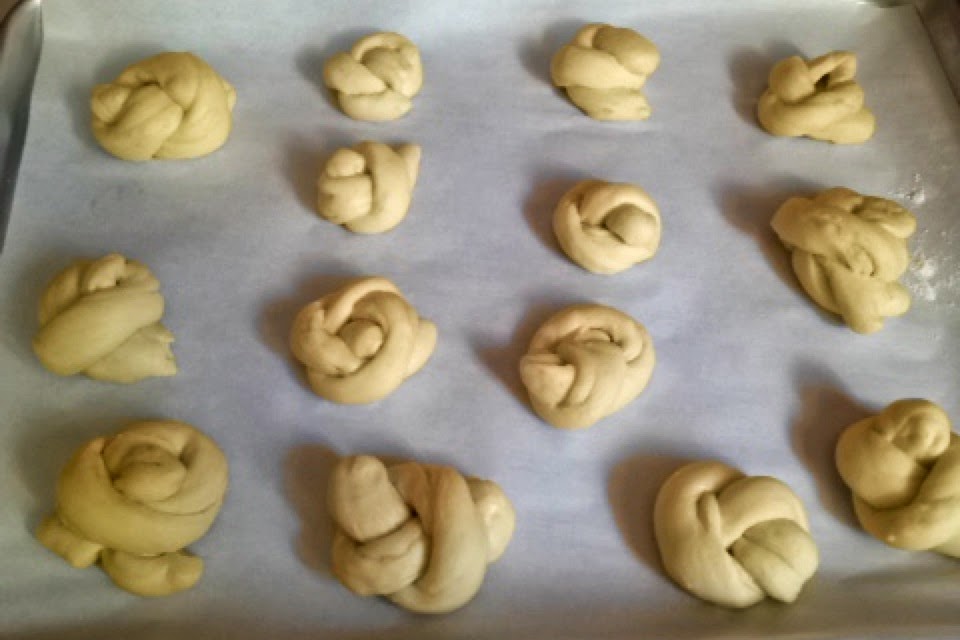
Homemade Garlic Knots!

Hi again!

I know it's been a long while since I updated last. As always, life happens and the simple pleasures of life get set aside. Not that my passion for baking has been set aside! I've been baking almost every day! From cookies, to cupcakes, to breads, to strudels. There is always freshly baked sweet or savory something in my house.

Today was no exception! I've been craving these little bad boys for a while now. I love it when I go into an Italian restaurant (fancy and non), and get garlic knots. They're always so garli-ky, oily, and there's always that something when you bite into one that makes you just say "yummmmmmm"! I've made these once before years ago, but these came out way better!


The recipe that I used was from another blog called White On Rice Couple. It's a great blog to check out and their recipes are great! Here is the link for the garlic knots recipe. 

These are oh so yummy!! Enjoy alone or with some pasta or marinara sauce! Thanks for checking my blog out! Come back soon for more!

By the way, if you live in the DMV area and want to check out my personal catering website, go check out Pastries by Joanna!

Adios!

-Joanna


Monday, January 6, 2014

Mastering the French Macaron!

I have accomplished one of my life goals, which was to make French Macarons!

Mastering the art of the French Macaron is a challenge. The process itself isn't hard, but it does take practice to make the technique perfect. There was so many ways in which you can screw up your recipe and technique if you're not careful. Otherwise, your macarons won't be smooth, round, and fluffy. There are a lot of websites and I suggest doing your homework and watching videos before trying to tackle these.

I used the Martha Stewart version of this recipe. I also printed out a template which can be found at the Food Nouveau site.

Here is my result after just a second try at making these babies!


Thanks for visiting!

-Joanna


Monday, December 16, 2013

Sourdough Day 2.

Technically, it's still Day 1, but since I started it at night, that was my first day.
The second day, I gave it it's first feeding.


It grew! Woo hoo!


Sunday, December 15, 2013

Sourdough!

I'm back from the unknown! Sorry that it's been almost a year since my last post. A lot has happened this year, and I haven't stopped baking. It is still a passion of mine but having a toddler running around doesn't leave you with much time or energy to focus on other things.

So I took the plunge and finally decided to do a sourdough starter. It has been something I've been meaning to do for a few years, knowing how delicious and flavorful sourdough breads can be. But my lack of knowledge of breads and, frankly, I was just plain scared out of my wits, about sourdough kept me from doing it.

But tonight, I said, what the hell. If it succeeds, it succeeds! If it fails, at least I tried and will try again (hopefully)!

Here is what my starter looked like when I finished making it. It all took about 5 minutes to prepare. That's it. All this time of being scared, and it took 5 minutes to start.


I used the King Arthur Sourdough Starter. This recipe gives you a VERY large amount of starter. I suggest scaling it down.

The basic directions to keep this thing alive is as follows:

Day 1: Make starter! Wait 12 hours. Mix (because it does separate), then take out half and toss in trash. 
(Yes. Toss it. At this stage, the starter hasn't matured enough for us to be able to use it. It won't reach this stage for a week. Too many foreign and nasty critters are roaming in our starter and the good guys need to have time to win.) So, when you've dumped out half, check how much you have left. I started with 4 cups of starter, will dump out 2 cups, so I have to give it equal parts of 1 cup flour, and 1 cup warm water to compensate for what was tossed. Don't use tap just yet. Wait another 12 hours. 

Be sure to feed your starter twice a day every day! Don't give up on your yeast! It is a living thing that needs your help to get going every day. Much like coffee gets us going every day. If we don't get it, we don't move as well as with the caffeine in our system.

Day 2. Mix again.  Dump out half again. Give it the appropriate amounts of flour and water. No tap. Wait another 12 hours. Dump out half again. Give it the appropriate amounts of flour and water. Wait 12 hours.

Day 3: This should bring you to day 3 if you've been good with time. Mix again.  Dump out half again. Give it the appropriate amounts of flour and water. No tap. Wait another 12 hours. Dump out half again. Give it the appropriate amounts of flour and water. Wait 12 hours.

Day 4: Mix again.  Dump out half again. Give it the appropriate amounts of flour and water. No tap. Wait another 12 hours. Dump out half again. Give it the appropriate amounts of flour and water. Wait 12 hours.

Day 5: Mix again.  Dump out half again. Give it the appropriate amounts of flour and water. No tap. Wait another 12 hours. Dump out half again. Give it the appropriate amounts of flour and water. Wait 12 hours.

Day 6: Mix again.  Dump out half again. Give it the appropriate amounts of flour and water. No tap. Wait another 12 hours. Dump out half again. Give it the appropriate amounts of flour and water. Wait 12 hours.

Day 7: Mix again.  Dump out half again. Give it the appropriate amounts of flour and water. No tap. Wait another 12 hours. Dump out half again. Give it the appropriate amounts of flour and water. Wait 12 hours.

Hopefully, at the end of Day 7, your starter is well and thriving, and ready for use! I shall let you know day by day (hopefully) how mine is growing. See you on Day 2!

By the way, if these directions do not work, I apologize and will make any necessary changes as I venture into my own starter experience. These directions are the basic kind. You can do more research on how to maintain sourdough starter through google and such. Happy Yeast Growing!

-Joanna

Quick update!

I know it's only been about 30 minutes since I posted this, but a lot has happened within that half hour! 
THIS is what happened.


So I gave it a new home. 


Now, since it got a new home, I decided that weighing the sucker would probably be a good idea so I would know how many grams of flour and water to add in 12 hours. I decided to only stick with 142 grams of the original starter.

See you tomorrow!


Monday, January 14, 2013

Classic Brioche!

Who doesn't love brioche?

It is so flaky, so buttery, so delicately delicious!

Anyone who has ever made brioche knows how time consuming this particular delight is, but the payoff is very much worth the patience! This is a recipe that you make on a lazy, foggy, Sunday when there is nothing else to do and you don't feel like doing much else.


This recipe is one I've made twice before. The first time, it came out wonderfully! The second, not so much rise and not much fluffiness. This time, it was right in the middle. I'm happy with the flakiness of the bread, but the outside and sides were a bit burnt. I believe that the culprit was my yeast. The dough didn't rise enough and I think I killed some of the yeast, so be sure your water is at the right temperature before mixing everything! (between 105 to 115 degrees F)

Anyway, this is a recipe from King Arthur. I found that this recipe is the best one I've tried. 

Oh, and you might have noticed that my brioche doesn't have the "typical brioche" look. I don't have the special pans that these amazing breads are supposed to be baked in. They're uni-taskers, and my philosophy is the same as Alton Brown's: the only uni-tasker in my kitchen is a fire extinguisher.

  • Ingredients:
  • 2 3/4 cups AP flour, divided
  • 1 1/2 tsp instant yeast
  • 1/4 cup water (between 105 to 115 degrees F for yeast)
  • 4 large eggs
  • 2 Tbs sugar
  • 3/4 tsp sal
  • 1 cup (2 sticks) unsalted butter, softened
egg wash:
1 large egg
1 tablespoon water

Directions:

Place 1 1/2 cups AP flour, yeast, water, and eggs into the bowl of an electric mixer with the flat beater attachment, or the bucket of the bread machine. Knead until smooth, about 5 minutes. Cover the mixture and let sit for 45 minutes. The mixture will look watery, so don't panic!

After 45 minutes, the sponge will have developed some bubbles. If not, check your yeast! Switch the beater to a dough hook. Add the remaining 1 1/4 cups flour, sugar, and salt. Beat for 8 to 10 minutes. The dough should clean the sides of the bowl and become shiny and elastic. 

With the mixer, or bread machine, running on medium, add the softened butter 2 Tbs at a time, letting the butter incorporate before adding more. Keep adding butter until you incorporate the 2 sticks. Cover and let rise for 1 hour. 

The dough should have grown about a third after the hour. Turn the dough onto a floured surface, or knead the dough in the bowl like I did, and fold it over several times. Cover the bowl and place in refrigerator for at least 4 hours to about 16 hours, to firm up (I didn't have the time to wait longer than 4 hours).

Divide the dough into 12 pieces. If you want the classic brioche look, take off a marble sized amount off of each piece and set aside. Roll each piece into a ball and place them in a greased tin or whatever pan you're using. Let these beauties rise for another 1 hour. Your patience will be rewarded!

Preheat oven to 375 degrees F. Prepare your egg wash. Beat egg with water until combined.

If you've set aside the little marble pieces, after the dough has risen and is puffy-looking, grease your finger and poke a little dent on top of each brioche. Place your marble on top of each one. Brush each brioche with the egg wash. Bake for 25 to 30 minutes. Watch your brioche well! If the tops seem to become too dark, take them out and check for doneness! 

After they're done baking, remove the brioche goodness from the over and let cool on a rack before serving. Best served warm!


Thanks for checking out this recipe! Please follow me on Pinterest! Let me know how your version of this recipe turned out. I would love pics! Just use the envelope link below to contact me. Thanks and Happy Baking!

-Joanna

Friday, December 28, 2012

Chocolate Walnut Biscotti

Hi! 

I know it's been a very LONG while since I've updated. A lot has happened since February 2011. 

Over the past 1 & 3/4 years, I found out I was pregnant, had a wonderful and fulfilling pregnancy, gave birth to a baby girl,  graduated from college, and now this baby girl has turned into a toddler and a very busy toddler at that! 

Being a mother has left me with no spare time whatsoever. Any mother can relate! I am still reading the 5th book in the Game of Thrones series for about a year already and working 3 jobs as well to gain nutritional/dietetic experiences for my upcoming Dietetic Internship application. So yes, I've been extremely busy! Anyway! I found the time today to make something I've been wanting to make for a very long time. 


Biscotti! I love biscotti! It's a simple indulgence with my morning coffee and I knew it was easy to make, just never had the time to make it. It seems like a complicated pastry to make but it's really not!

I found this recipe from Epicurious.com called Double Chocolate Walnut Biscotti. Since pastries often disappear in my house, I always make double batches. This recipe below is for a single batch.

Yield: ~20 biscotti

Ingredients:
2 cups all-purpose flour
1/2 cup unsweetened cocoa powder
1 teaspoon baking soda
1 teaspoon salt
3/4 stick (6 Tbs) unsalted butter, softened
1 cup granulated sugar
2 large eggs
1 cup walnuts, chopped
3/4 cup semisweet chocolate chips

Directions:
Preheat oven to 350 degrees F. Place 2 oven racks, evenly spaced from the top and bottom of the oven. Butter and flour a large baking sheet or place parchment paper over baking sheet.

In a bowl, sift together the flour, cocoa powder, baking soda, and salt. 
In another bowl with an electric mixer or a hand mixer, cream butter and sugar until light and fluffy. Add eggs, one at a time until each is incorporated, and beat until combined. Stir in four mixture to form a stiff dough. Use your hands, which is easier, to mix the dough to form a ball. Add walnuts and chocolate chips, and knead the dough until fully incorporated.
Separate the dough into 2 equal halves.

On the prepared baking sheet with floured hands, form each half of dough into a slightly flattened "log", each about 12 inches long and 2 inches wide. This doesn't have to be perfect. 
Bake these "logs" for 35 minutes, or until slightly firm to the touch. Half-way through baking, rotate the pans from top to bottom and 180 degrees. Depending on your oven, this ensures an even baking. 
When 35 minutes are up, cool the biscotti on baking sheets for 5 minutes. If you used parchment paper, cut the biscotti diagonally into 3/4-inch slices. Arrange biscotti, cut side down, on baking sheet and bake until crisp, about 10 minutes. Cool the biscotti on a rack.

These will keep for about a week in an airtight container, or freeze in an airtight container and these will keep for about a month.

Enjoy!


If you have a biscotti recipe, or any recipe for that matter, please e-mail me or send a message! I would love to try it!

-Joanna

By the way, follow me on Pinterest! My user name is BlackInkPhoto.

Friday, February 25, 2011

Oh-So Yummy Dinner Rolls!

So it's been a while since I updated, so I thought I'd write a quick post regarding dinner rolls.

Yes, dinner rolls.


You're probably thinking, what's so special about dinner rolls? Well, let me say that it'll save you money! If you're one of those families that eat a million of those delectable dinner rolls that come in a bag for $3.99 at Costco, you can save yourself a trip to Costco and therefore save gas and save time waiting in line just to buy those dinner rolls. Because you know that if you go to Costco for one thing, you'll come out with 5 more items and $40 bucks, at least, spent.

So skip all that and make them at home! It's easy!!

By the way, stick around til the very end of this post because the nutritional values are listed! And the alternative for whole wheat dinner rolls.


Makes: 4 & 1/2 dozen dinner rolls
(If you want to make less, divide the recipe ingredients in half)

By the way, a scale would be a useful tool here. If you don't have one, here's a hint with conversions:
8 oz = 1 cup
16 oz = 1 lb
1/4 oz = 2.25 teaspoons

Ingredients:
Water (110 degrees F): 3/4 cups + 4 cups (separated!)
Sugar: 3/4 teaspoon + 5.5 oz (separated!)
Yeast (dry): 1.12 oz ( or 4 & 1/2 packets)
All-Purpose Flour: 3.3 pounds + extra if the dough is too sticky
Milk, dry: 1.5 oz (or 1 cup of 2% milk)
Salt: 3/4 teaspoon
Butter: 5.5 oz (or 2 sticks + 1 tablespoon)
Egg: 1 (for egg wash)

Let's begin.

Pour the 3/4 cups of 110 degree water into a small bowl. Sprinkle the yeast and sugar into the bowl and mix just until combined. Set aside and let rest for 10 minutes. Watch for overflow! These little suckers grow quick!

While your yeast is eating and burping, divide the 3.3 pounds in half and place one half of the flour into one bowl, one preferably being a bowl of an electric mixer fitted with a dough hook, and the other half in another bowl. This recipe will overflow your 4.5 qt electric mixer bowl. I suggest either using a bigger bowl, if you have one, or go the knead-by-hand method.
(If you don't have one, use a really large bowl where it gives you enough room to knead the dough inside. Don't have a large bowl? Use a clean countertop, pour one of your half of the dough onto the counter, make a well in the middle, and with clean hands, incorporate the ingredients into your dough.)
In the bowl of the electric mixture, place the dry milk (or milk) and yeast mixture. Mix on slow with the dough hook attachment. Add the sugar, butter, and 4 cups of water into the electric bowl mixture. Mix on low for a few minutes. Slowly, add the remaining flour. Add additional flour or water, if needed. The dough should be soft, but not sticky. Shape the dough into a ball. Allow to rise for about 1 & 1/2 hours, or until doubled in size.

-You can also decrease your proofing time by making your own proofer out of your home oven.  The bowl that you place the dough into has to be a stainless steel one or a oven-safe bowl.

Here's how to make an easy yeast bread proofer out of your oven!
Step 1: Turn oven on to 225 degrees F
Step 2: Fill an oven-safe container with water and place on the most lower rack.
Step 3: Rearrange the racks in the oven so that your bowl with the finished dough fits. Do not remove the water out just yet.
Step 4: Place your oven-safe bowl with dough into the oven.
Step 5: Close the oven door.

-This moist environment will help your dough rise faster. No need to cover the bowl if you put it in the oven. For this recipe, if you used an oven proofer box, the rising time should be only about 25-40 minutes.

Grease your pans with butter or shortening. Measure out 1.5 oz balls. Set the dough balls on the baking pans and proof again for about 20 minutes. Make yourself an egg wash and brush each dough ball with it. Finally, bake at 350 degrees F for 6-10 minutes.  Enjoy!


Nutritional Content:
Per 1 serving = 1- 1.5 oz dinner roll

Made with All-Purpose Flour:                                Made with Whole Wheat Flour:

kcal: 132.64 calories                                                      kcal: 125.70 calories
Protein: 3.26 grams                                                       Protein: 4.19 grams
Carbs: 24.37 grams                                                       Carbs: 23.33 grams
Total Fat: 2.31 grams                                                    Total fat: 2.56 grams
Cholesterol: 7.24 mg                                                     Cholesterol: 7.24 mg
Dietary Fiber: 0.87 grams                                             Dietary Fiber: 3.51 grams
Sodium: 155.42 mg                                                        Sodium: 156.25 mg

Saturday, January 22, 2011

Cinnamon Raisin Swirl Bread


I. love. this. recipe.  

I got a new book recently, that I also bought for my sister, called Vegan Yum Yum. This is an amazing cookbook! The author, Lauren Ulm, has a blog called Vegan Yum Yum, in which she posts vegan recipes to suit her pallet and the pallet of other Vegans.  I try to eat vegan sometimes, but it is a hard task to do, and I commend those who are able to live a vegan lifestyle.  I am more of a vegetarian when it comes to food.  I will use the butter because Earth Balance isn't something I normally stock in my fridge. I usually buy the bulk butter from Costco, because, let's face it, it's cheaper! 

Anyway,  I want to share a recipe called Cinnamon Raisin Swirl Bread, from Lauren Ulm's new cookbook. This recipe is tasty and a great bread to have around when a snack is needed or bread for breakfast, lunch, or dinner.  

I wanted to bake something for my mom while I was on vacation in Florida.  I'm always baking at home, and my mom never gets to taste anything I bake, so I wanted her to taste a recipe. I decided to go for this recipe because it is my mom's favorite type of bread. She usually buys the raisin bread from the local Natural Foods store.  Now that she has this recipe, I think she will be making her own!

Alterations from original recipes:

1. I used Organic All-Purpose flour instead of bread flour.  I honestly tried to look for bread flour in 3 different stores. But, as luck would have it, I did not find any.  I even looked in a Natural Foods store! But they only carried German bread mix. 

2. I put an egg-wash on top of my bread. The original recipe calls for sprinkled water on top, because eggs aren't vegan friendly, but I know from previous baking experience, that egg-washes give the baked goods a nice golden brown top.

I won't give away the recipe in this blog, however, because I want you all to go out and buy the Vegan Yum Yum book! I will ask the owner of the book if I may post the recipe here later on though.  If she agrees, then I will post it.  For now, here are some of my pictures that I took of the bread. Enjoy!


-Joanna

Sunday, November 21, 2010

White Chocolate Cheesecake

I made this cheesecake last week because I wanted some chocolate cheesecake. Then, I thought, why not make one a chocolate cheesecake, and another one a white chocolate cheesecake? Upon completion of my little experiment, I realized that this was an amazing cheesecake! So, I repeated the recipe last night. Yes, I did make 1 chocolate and 1 white chocolate, but let's focus on the white chocolate cheesecake, since this is an uncommon cheesecake that we do not share often.


*Recipe modified from The Joy of Cooking, 75th Anniversary Edition. Btw, during the first endeavor of this recipe, I managed to be a klutz and spill 2 sticks of hot butter all over my book now some of my pages smell and feel like butter. "That means the book is being used, no?", is what my niece told me once.


Moving on!

Hardware:
1 - 9" spring-form pan 

Prepare the melted chocolate first before beginning anything! It needs to cool.
Oh! And be sure to have all your ingredients at room temp. It'll be easier to handle if it's all slightly warmed up.

8 oz (by weight please) white chocolate, finely chopped
1/3 cup boiled hot water

Place the white chocolate into a heat proof bowl. Pour the hot water over the it. Wait 2-3 minutes and stir until fully mixed and incorporated. Let cool. 

Software:
For the crust:
1 1/2 cups ground graham crumbs (yes, the stuff out of the box is ok to, find it in the baking isle)
1/4 - 1/2 cup sugar (I used the 1/4 cup, depending on your sweet tooth)
6 tablespoons (3/4 sticks) melted butter (and cooled!!)

In the mean time, preheat the oven to 350 degrees F. In a bowl, mix the crumbs with the sugar, then add the melted butter. Mix until coarse crumbs stick together. You may need to add more butter in this if you think it's too crumbly. I didn't like the extra fat in mine, so I opted for the more crumbly crust. Dump the crumbs into the spring-form pan. Spread out the crumbs until the bottom and the sides have crumbs around them. Press the crumbs down to flatten. The sides will not have the crumbs going all the way up so don't worry. Plus, your sides do not have to be perfect unless you want them to be perfectly even, but good luck. Place the crust into the oven for 10 minutes. Next!

 For the cheesecake:

1 pound (2 - 8 oz packages) cream cheese
2/3 cups sugar
1 teaspoon vanilla
3 large eggs
2 cups sour cream

In a bowl of an electric mixer (it can be done by hand but it'll be a little harder), place the cream cheese and mix with a paddle until creamy. Scrape the sides of the bowl then add the sugar and vanilla. Cream together for about 1 to 2 minutes.  Scrape the bowl again. Next, incorporate 1 egg at a time. Add the next egg when you do not see the previous egg anymore. After the eggs are incorporated, add the 2 cups of sour cream. Mix the ingredients together until smooth. Be sure to scrape the bottom and sides of the bowl to get everything together.

Pour the contents into the crust of the spring-form pan. Don't worry about going over the crust that you made. It will all harden when finished and it will be great! Bake at 350 degrees F for 40 to 45 minutes.

When you're done baking the cheesecake, open the door slightly and leave it ajar for about 1 hour. Turn off the oven. Let the cheesecake cool for the hour and then place in the fridge to cool completely, preferably over night, or 24 hours if time permits.

Variations:
Chocolate cheesecake: minus the melted white chocolate, instead add 8 oz (yes, by weight!)  of melted semi-sweet chocolate.


Upon refrigeration, I got a chocolate square and shaved some chocolate over the top. 


I hope you enjoyed reading, and try the recipe! It's so EASY to make and it's delicious. Why spend $15 - $20 on something you can make yourself? It won't contain all the extra gelatin and preservatives as the store bought kind. Give it a try and post below about it! I would love to hear how yours came out.


Sunday, October 3, 2010

Oatmeal Raisin Muffins

I decided to make Oatmeal Raisin Muffins. Why? Because I needed a healthier muffin on the go when I run off to school in the morning. Recipe is from, as most of the time, from the Joy of Cooking (75th edition) book under the Muffin section, with, as always, healthier tweeks by me. The recipe in the Joy of Cooking book has the basic muffin recipe. I added the oats, raisins, cinnamon, and flaxseed in my variation.


Recipe:
     Makes 12 small muffins, or 6 Jumbo muffins.
  • 2 cups all-purpose flour
  • 1 tablespoon baking powder
  • 1/2 teaspoon salt
  • 1/4 teaspoon ground cinnamon or ground nutmeg (optional)
  • 1/4 cup freshly ground flaxseed (optional)
Preheat oven to 400 degrees F. Grease the muffin tins with either spray oil or line with paper liners. 

In a large bowl, mix together the flour, baking powder, salt, cinnamon, and flaxseed. 
  • 2 large eggs
  • 1 cup milk or cream
  • 2/3 cup sugar or packed light brown sugar
  • 1/4 to 1/2 cup (1/2 to 1 stick) butter, melted, or vegetable oil 
  • 1 teaspoon vanilla extract
In another bowl, whisk together the eggs, milk (or cream), sugar (or light brown sugar), vanilla, and butter (or oil). 
Add to the flour mixture and fold the ingredients together until just mixed. Do not over beat!
  • 1 cup old-fashioned oats
  • 1 cup raisins
Put in the oats and raisins and fold until just mixed. Again, do it in the fewest strokes possible. You don't want tough muffins. Bake at 400 degrees F for 17 minutes. Mine took 23 minutes because I made the jumbo. It might take about 20 minutes for this variation for the smaller muffins.  Check with a toothpick to make sure it comes out clean and fully baked. Enjoy!


Pros:
A nice and healthier alternative to the greasy muffins sold everywhere else. They weren't greasy with oil upon touch. 
Also, it was a great breakfast muffin with some coffee. 

Cons:
It felt a little dense for me when I made them.  I doubled the recipe to make more jumbo muffins, since I have a large family to feed and they eat more than 1 muffin per person. I also put in double the amount of oats, which I think took away the moisture out of the muffins. I changed the recipe above to lower the cups of oats and raisins added to hopefully have your muffins come out more moist than mine. 

Enjoy! Feel free to comment how yours came out!

Sunday, September 26, 2010

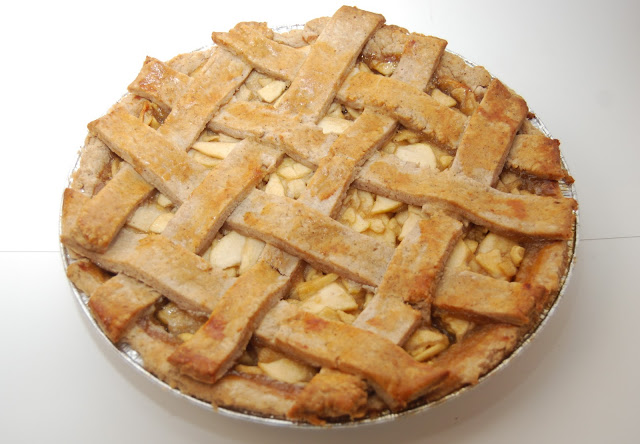
Classic Apple Pie!

Since it's the beginning of the wonderful season of fall, I decided to go with a classic, and make Apple Pie!
-Recipe courtesy of the Joy of Baking (75th edition), with some tweeks by me.


The recipe for the dough of the crust and lattice is dedicated to Iris, whom I met last night. She questioned how to make a good crust because her store-bought crusts always burn. Iris, buying crusts ends today! 

Dough for crust and top:
*this makes a 9-inch double crust, if you do not want a top (such as a cover or lattice), cut the recipe in half.
  • 2 1/2 cups all-purpose flour
  • 1 1/4 teaspoon salt
  • 3/4 cup chilled vegetable shortening
  • 3 tablespoons cold unsalted butter
  • 2 tablespoons freshly ground flaxseed (optional)
  • 2 teaspoons good quality cinnamon (optional)
Mix the flour, salt together. Add ground flaxseed and cinnamon if you opted for it and mix. Put in the shortening and butter into the flour mixture and "cut" the shortening and butter into the mixture. You can either use a pastry blender or 2 forks, but I prefer to use my hands and mix the mixture until pea-sized balls come together. (I squeeze the butter and shortening in my hands as I mix it thoroughly.) When the dough has reached pea-sized balls, sprinkle in 6 tablespoons of ice water. Blend gently until the dough comes together into a ball. If you're doing the double crusts, cut the dough in half. If necessary, add 1 teaspoon to 1 tablespoon of ice water into the dough. If it's too crumbly and won't stick together, add a bit of ice water and knead. Cover each piece of dough in plastic wrap, and place in the refrigerator for at least 30 minutes. 


While the dough is resting in the refrigerator, prep the filling.
  • 2 1/2 pounds pounds apples (5 to 6 large)
  • 3/4 cup sugar
  • 2 to 3 tablespoons all-purpose flour
  • 1 tablespoon fresh lemon juice
  • 1/2 teaspoon ground cinnamon
  • 1/8 teaspoon salt
  • 2 tablespoons unsalted butter, cut into small pieces
  • 1/2 teaspoon cinnamon (optional)
Prep the apples by peeling, coring, and slicing and put into a large bowl. Place the sugar, flour, lemon juice, cinnamon, and salt into the bowl with the apples. Toss to coat the apple slices evenly. Let stand for 15 minutes for the apples to soften.

Preheat oven at 425 degrees. After 30 minutes of resting, unwrap the dough and place on a flat, clean surface. You may place some flour on the surface to keep the dough from sticking. (Use a pastry mat, if you have it.) Roll out to a 10-inches circle. Place the dough into a 9-inch pie pan. Poke holes on the bottom of the dough with a fork and place either another pie pan on top or a bag of beans to keep the dough from rising up. Bake for 5 to 10 minutes.  Cool completely after baking. 

After the crust has cooled, put the apple filling into the pie pan. Level the top with a spoon. Place the cubed unsalted butter (and cinnamon, if you want to) on top of the apple filling. If you opted for the top crust, design as you may like! I used an egg wash over the top of the lattice to brown it. If not, place the pie into the oven at 425 degrees. Bake for 30 minutes. After 30 minutes, lower the temperature to 350 degrees and place a baking sheet below the pie to catch any spill-overs. Bake for another 30 minutes. Cool completely after baking. Your patient will be rewarded! Enjoy!


Pros:
My husband is not an apple-pie fan, but he loved it! It's not too sweet and a prefect combination with vanilla ice cream. I really liked this pie. I was very happy that it came out! The one I made last year was way too runny. 


Cons:
None! 


-Feel free to comment below! Enjoy making the recipe!

Tuesday, June 22, 2010

Blueberry Tart

Today, as promised to my husband, I made him a Blueberry Tart. My inspiration was from the Joy of Cooking (75th edition) book, but I changed some ingredients around. I made a chocolate cheesecake on sunday but it was eaten before I had a chance to take pictures of it so that will have to wait again.


Let's get started!

The dough:
1 1/2 cups all-purpose flour
1/2 cup powdered sugar
3/4 cup butter (1 1/2 sticks) softened

Preheat oven to 350 degrees F. Combine the flour and sugar until mixed. Add the softened butter until the dough resembles little crumbs of dough (about 2 minutes of mixing by electric mixer). Place the dough into a tart pan and spread it out to the sides and up the sides of the pan. Poke holes in the dough so that steam may escape during baking. Bake the pan at 350 degrees F for 10 to 12 minutes. Cool after baking. Turn your oven down to 325 degrees F.

The filling:
2 cups fresh blueberries (you can used thawed drained blueberries too)
3 large eggs
1/2 cup sugar
1/2 cream cheese, cut into pieces

In a bowl of an electric mixer, beat the eggs until combined. Place the sugar and cream with the eggs. Add the cream cheese and combine. Finally, add the blueberries. Place the filling into the prepared tart pan. Do not overfill. Bake at 325 degrees F for 1 hour. Watch your crust!! It could start to burn towards the end. Also, watch the top of your tart as it might burn as well. If that is the case, simply bake for 45 to 50 minutes instead of the 1 hour. Let cool before serving and enjoy with some vanilla ice cream.

Verdict:

I think I should have used the sour cream like the original recipe asked. I did not have any sour cream and had cream cheese instead. It made the tart have a creamy filling but it wasn't sweet like I expected it to be. I would like to have put fresh blueberries on top if I had some. That is an option for the future. The crust was thick around the edges, so it made it a little hard to cut through. All in all, my husband gave it a 9. I, myself, give it a 7. I was a little disappointed with the way it looked in the end, but that's something else to strive for with round 2. Enjoy!

-Joanna
Let's Move

Followers